Oracle lunux 7과 6은 동일하게 하셔도 무방합니다.
루트 사용자로 실행합니다.
아래의 명령어로 OL 저장소를 활성화합니다.
# OL7
yum install -y yum-utils
yum-config-manager --enable ol7_optional_latest
OR (OL7의 경우 위 명령어, 아래 명령어 선택하셔서 사용하세요.)
# OL7
yum-config-manager --enable ol7_developer_EPEL

# OL8
dnf 설치 -y oracle-epel-release-el8
또는 공식 EPEL 릴리즈를 하셔도 무방합니다.
# OL7
CD/tmp
wget https://dl.fedoraproject.org/pub/epel/epel-release-latest-7.noarch.rpm
rpm -Uvh /tmp/epel-release-latest-7.noarch.rpm

# OL8
CD/tmp
wget https://dl.fedoraproject.org/pub/epel/epel-release-latest-8.noarch.rpm
rpm -Uvh /tmp/epel-release-latest-8.noarch.rpm
Oracle linux server 에서는 스냅이라는 것을 설치하셔서 let's encrypt를 사용할 수 있습니다.
# OL7
yum install -y snapd
systemctl enable --now snapd.socket
systemctl start snapd
ln -s /var/lib/snapd/snap /snap

# OL8
dnf install  -y snapd
systemctl enable --now snapd.socket
systemctl start  snapd
ln -s /var/lib/snapd/snap /snap
스냅 코어를 설치 후, 새로고침 합니다.
snap install core
snap refresh core
certbot 을 install 합니다.
snap install --classic certbot
ln -s /snap/bin/certbot /usr/bin/certbot
아래와 같이 사용합니다.
다른 OS와 명령어가 다른 부분은 certbot을 /usr/bin/certbot 으로 대신해서 사용한다는 것입니다.
# For Apache:

/usr/bin/certbot certonly --webroot -w /var/www/html --email root@example.com -d example.com -d www.example.com

# For Tomcat:

/usr/bin/certbot certonly --webroot -w $CATALINA_HOME/webapps/ROOT --email root@example.com -d example.com -d www.example.com
하지만, 저의 경우 NGINX에 설정을 하고, DNS 방식으로 SSL을 적용하기 위해
아래와 같은 방법은 manual 옵션으로 dns 방식으로 인증서를 발급받는 방법인데 와일드카드 URL을 지원한다는 장점이 있다. 그리고 인증서만 발급되기 때문에, 웨베 서비스의 설정파일을 자동으로 변경하지 않는다.
또, standalone 방식으로 발급할 경우, web service 를 잠시 중단해야하지만, 중단할 필요가 없다.
주의해야할 사항은 하루에 3번 밖에 발급되지 않아... 테스트하다가... 당일에 적용하지 못하였다.
/usr/bin/certbot certonly --manual --preferred-challenges dns-01 --server https://acme-v02.api.letsencrypt.org/directory --agree-tos -m test@test.com -d *.test.com
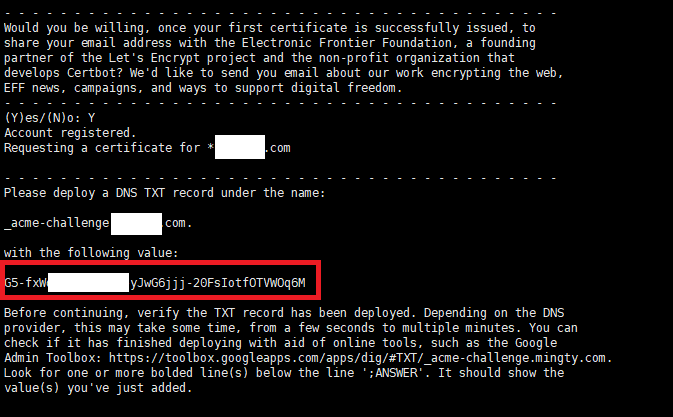
명령어를 사용하게 되면, 위와 같이 빨간 네모 칸 안에 record 값이 생성되는데,
이 부분은 도메인 호스팅 서비스에

위와 같이, _acme-challenge 를 설정하고, 값에는 위에 생성된 레코드 값을 저장한다. 그리고 쌍따옴표를 앞뒤로 감싸한다.
[주의] 필자의 경우, 이 것때문에, 당일에 적용하지 못하였다. 도메인 호스팅에 TXT 레코드를 저장 후,
쉘에서 엔터를 눌러야햔다.
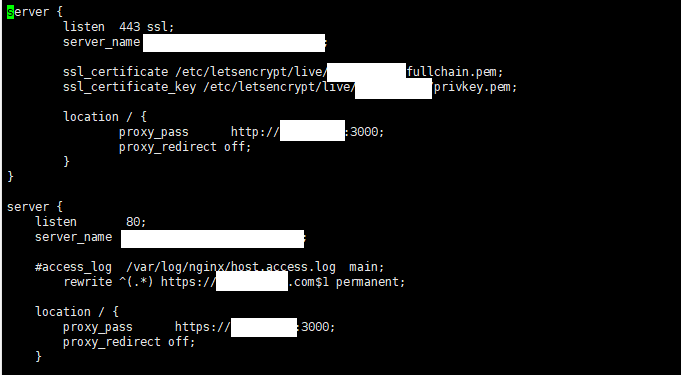
http로 들어올 경우 rewrite로 https로 리다이렉트 시키고 443포트에 ssl 적용을 하였다.
인증서 갱신을 위해
crontab에
sudo crontab -e
일반적인 경우, 아래의 명령어로 갱신할 수 있지만,
# 3개월 마다 인증서를 자동 갱신
15 3 * * * certbot renew --quiet --renew-hook "/etc/init.d/nginx reload"
manual로 생성했을 경우 certbot 자동 갱신 명령어로는 갱신되지 않는다.
/usr/bin/certbot --server https://acme-v02.api.letsencrypt.org/directory -d \*.test.com -d test.com --manual --preferred-challenges dns-01 certonly
주기적인 알람을 통해, 갱신시켜주어야 한다.
sudo nslookup -type=txt _acme-challenge.text.com위 명령어로, 도메인호스팅 서비스에서 등록한 _acme-challenge 값을 확인할 수 있다.
'Server > Linux' 카테고리의 다른 글
| [Linux] expect를 이용하여 쉘스크립트를 실행시켜 다른 서버 원격 접속하여 명령어 날리기 (0) | 2022.11.30 |
|---|---|
| [Linux] 리눅스 타임존(TimeZone, TZ) 한국 표준시(KST)로 변경하기 (0) | 2022.11.29 |
| [linux] nginx 사용시 proxy_pass 연결 안되는 경우 해결법 (0) | 2022.03.30 |
| [centos7] nginx 안정화 설치하기 (0) | 2022.03.29 |
| [linux] firewalld 방화벽 포트 열기 (0) | 2022.03.29 |

댓글